需求 数据流图
JS-SDK Java-SDK BlockingQueue 使用 :
https://app.yinxiang.com/shard/s66/nl/15607671/d69a1aac-5cd6-46fd-ad1f-b28a4d7850b4
Nginx 搭建 注册 Nginx 服务 1 2 3 4 5 6 7 8 9 10 11 12 13 14 15 16 17 18 19 20 21 22 23 24 25 26 27 28 29 30 31 32 33 34 35 36 37 38 39 40 41 42 43 44 45 46 47 48 49 50 51 52 53 54 55 56 57 58 59 60 61 62 63 64 65 66 67 68 69 70 71 72 73 74 75 76 77 78 79 80 81 82 83 84 85 86 87 88 89 90 91 92 93 94 95 96 97 98 99 100 101 102 103 104 105 106 107 108 109 110 111 112 113 114 115 116 117 118 119 120 121 122 123 124 125 126 127 128 129 130 131 132 133 134 135 136 137 138 139 140 141 142 143 144 145 146 147 148 149 150 151 152 安装之前准备 1、依赖 gcc openssl-devel pcre-devel zlib-devel 安装:yum install gcc openssl-devel pcre-devel zlib-devel -y 安装Nginx ./configure make && make install 默认安装目录: /usr/local/nginx 配置Nginx为系统服务,以方便管理 1、在/etc/rc.d/init.d/目录中建立文本文件nginx 2、在文件中粘贴下面的内容: # !/bin/sh# # nginx - this script starts and stops the nginx daemon# # chkconfig: - 85 15 # description: Nginx is an HTTP(S) server, HTTP(S) reverse \# proxy and IMAP/POP3 proxy server# processname: nginx# config: /etc/nginx/nginx.conf# config: /etc/sysconfig/nginx# pidfile: /var/run/nginx.pid # Source function library.. /etc/rc.d/init.d/functions # Source networking configuration.. /etc/sysconfig/network # Check that networking is up.[ "$NETWORKING" = "no" ] && exit 0 nginx="/usr/local/nginx/sbin/nginx" prog=$(basename $nginx) NGINX_CONF_FILE="/usr/local/nginx/conf/nginx.conf" [ -f /etc/sysconfig/nginx ] && . /etc/sysconfig/nginx lockfile=/var/lock/subsys/nginx make_dirs() { # make required directories user=`nginx -V 2>&1 | grep "configure arguments:" | sed 's/[^*]*--user=\([^ ]*\).*/\1/g' -` options=`$nginx -V 2>&1 | grep 'configure arguments:'` for opt in $options; do if [ `echo $opt | grep '.*-temp-path'` ]; then value=`echo $opt | cut -d "=" -f 2` if [ ! -d "$value" ]; then # echo "creating" $value mkdir -p $value && chown -R $user $value fi fi done } start() { [ -x $nginx ] || exit 5 [ -f $NGINX_CONF_FILE ] || exit 6 make_dirs echo -n $"Starting $prog: " daemon $nginx -c $NGINX_CONF_FILE retval=$? echo [ $retval -eq 0 ] && touch $lockfile return $retval } stop() { echo -n $"Stopping $prog: " killproc $prog -QUIT retval=$? echo [ $retval -eq 0 ] && rm -f $lockfile return $retval } restart() { configtest || return $? stop sleep 1 start } reload() { configtest || return $? echo -n $"Reloading $prog: " killproc $nginx -HUP RETVAL=$? echo } force_reload() { restart } configtest() { $ nginx -t -c $NGINX_CONF_FILE} rh_status() { status $prog } rh_status_q() { rh_status >/dev/null 2>&1 } case "$1" in start) rh_status_q && exit 0 $1 ;; stop) rh_status_q || exit 0 $1 ;; restart|configtest) $1 ;; reload) rh_status_q || exit 7 $1 ;; force-reload) force_reload ;; status) rh_status ;; condrestart|try-restart) rh_status_q || exit 0 ;; *) echo $"Usage: $0 {start|stop|status|restart|condrestart|try-restart|reload|force-reload|configtest}" exit 2 esac 3、修改nginx文件的执行权限 chmod +x nginx 4、添加该文件到系统服务中去 chkconfig --add nginx 查看是否添加成功 chkconfig --list nginx 启动,停止,重新装载 service nginx start|stop
Nginx.conf 配置 1 2 3 4 5 6 7 8 9 10 11 12 13 14 15 16 17 18 19 20 21 22 23 24 25 26 27 28 29 30 31 32 33 34 35 36 37 38 39 # user nobody;worker_processes 1; events { worker_connections 1024; } http { include mime.types; default_type application/octet-stream; log_format my_format '$remote_addr^A$msec^A$http_host^A$request_uri'; sendfile on; #tcp_nopush on; #keepalive_timeout 0; keepalive_timeout 65; server { listen 80; server_name localhost; location / { root html; index index.html index.htm; } location = /log.gif { default_type image/gif; access_log /opt/data/access.log my_format; } error_page 500 502 503 504 /50x.html; location = /50x.html { root html; } } }
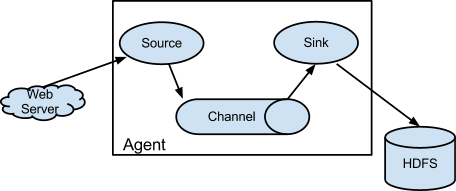
Flume Flume 简介
Flume is a distributed, reliable, and available service for efficiently collecting, aggregating, and moving large amounts of log data.
It has a simple and flexible architecture based on streaming data flows. It is robust and fault tolerant with tunable reliability mechanisms and many failover and recovery mechanisms. It uses a simple extensible data model that allows for online analytic application.
Flume 官网:http://flume.apache.org/
Flume 安装配置及案例 1 2 3 4 5 6 7 8 9 10 11 12 13 14 15 16 17 18 19 20 21 22 23 24 25 26 27 28 29 30 31 32 33 34 35 36 37 38 39 40 41 42 43 44 45 46 47 48 49 50 51 52 53 54 55 56 57 58 59 60 61 62 63 64 65 66 67 68 69 70 71 72 73 74 75 76 77 78 79 80 81 82 83 84 85 86 87 88 89 90 91 92 93 94 95 96 97 98 99 100 101 102 103 104 105 106 107 108 109 110 111 112 113 114 115 116 117 118 119 120 121 122 123 124 125 126 127 128 129 130 131 132 133 134 135 136 137 138 139 140 141 142 143 144 145 146 147 148 149 150 151 152 153 154 155 156 157 158 159 160 161 162 163 164 165 166 167 168 169 170 171 172 173 174 175 176 177 178 179 180 181 182 183 184 185 186 187 188 189 190 191 192 193 194 195 196 197 198 199 200 201 202 203 204 205 206 207 208 209 210 211 212 213 214 215 216 217 218 219 220 221 222 223 224 225 226 227 228 229 230 231 232 233 234 235 236 237 238 239 240 241 242 243 244 245 246 247 248 249 250 251 252 253 254 255 256 257 258 259 260 261 262 263 264 265 266 267 268 269 270 271 272 273 274 275 276 277 278 279 280 281 282 283 284 285 286 287 288 安装 1、上传 2、解压 3、修改conf/flume-env.sh 文件中的JDK目录 注意:JAVA_OPTS 配置 如果我们传输文件过大 报内存溢出时 需要修改这个配置项 4、验证安装是否成功 ./flume-ng version 5、配置环境变量 export FLUME_HOME=/home/apache-flume-1.6.0-bin Source、Channel、Sink有哪些类型 Flume Source Source类型 | 说明 Avro Source | 支持Avro协议(实际上是Avro RPC),内置支持 Thrift Source | 支持Thrift协议,内置支持 Exec Source | 基于Unix的command在标准输出上生产数据 JMS Source | 从JMS系统(消息、主题)中读取数据 Spooling Directory Source | 监控指定目录内数据变更 Twitter 1% firehose Source| 通过API持续下载Twitter数据,试验性质 Netcat Source | 监控某个端口,将流经端口的每一个文本行数据作为Event输入 Sequence Generator Source | 序列生成器数据源,生产序列数据 Syslog Sources | 读取syslog数据,产生Event,支持UDP和TCP两种协议 HTTP Source | 基于HTTP POST或GET方式的数据源,支持JSON、BLOB表示形式 Legacy Sources | 兼容老的Flume OG中Source(0.9.x版本) Flume Channel Channel类型 说明 Memory Channel | Event数据存储在内存中 JDBC Channel | Event数据存储在持久化存储中,当前Flume Channel内置支持Derby File Channel | Event数据存储在磁盘文件中 Spillable Memory Channel | Event数据存储在内存中和磁盘上,当内存队列满了,会持久化到磁盘文件 Pseudo Transaction Channel | 测试用途 Custom Channel | 自定义Channel实现 Flume Sink Sink类型 说明 HDFS Sink | 数据写入HDFS Logger Sink | 数据写入日志文件 Avro Sink | 数据被转换成Avro Event,然后发送到配置的RPC端口上 Thrift Sink | 数据被转换成Thrift Event,然后发送到配置的RPC端口上 IRC Sink | 数据在IRC上进行回放 File Roll Sink | 存储数据到本地文件系统 Null Sink | 丢弃到所有数据 HBase Sink | 数据写入HBase数据库 Morphline Solr Sink | 数据发送到Solr搜索服务器(集群) ElasticSearch Sink | 数据发送到Elastic Search搜索服务器(集群) Kite Dataset Sink | 写数据到Kite Dataset,试验性质的 Custom Sink | 自定义Sink实现 案例1、 A simple example http://flume.apache.org/FlumeUserGuide.html#a-simple-example 配置文件 # ########################################################### # Name the components on this agent a1.sources = r1 a1.sinks = k1 a1.channels = c1 # Describe/configure the source a1.sources.r1.type = netcat a1.sources.r1.bind = localhost // 改成主机名 a1.sources.r1.port = 44444 # Describe the sink a1.sinks.k1.type = logger # Use a channel which buffers events in memory a1.channels.c1.type = memory a1.channels.c1.capacity = 1000 a1.channels.c1.transactionCapacity = 100 # Bind the source and sink to the channel a1.sources.r1.channels = c1 a1.sinks.k1.channel = c1 # ###########################################################启动flume flume-ng agent -n a1 -c conf -f simple.conf -Dflume.root.logger=INFO,console 安装telnet yum install telnet 退出 ctrl+] quit Memory Chanel 配置 capacity:默认该通道中最大的可以存储的event数量是100, trasactionCapacity:每次最大可以source中拿到或者送到sink中的event数量也是100 keep-alive:event添加到通道中或者移出的允许时间 byte**:即event的字节量的限制,只包括eventbody 案例2、两个flume做集群 node01服务器中,配置文件 # ########################################################### # Name the components on this agent a1.sources = r1 a1.sinks = k1 a1.channels = c1 # Describe/configure the source a1.sources.r1.type = netcat a1.sources.r1.bind = node1 a1.sources.r1.port = 44444 # Describe the sink # a1.sinks.k1.type = logger a1.sinks.k1.type = avro a1.sinks.k1.hostname = node2 a1.sinks.k1.port = 60000 # Use a channel which buffers events in memory a1.channels.c1.type = memory a1.channels.c1.capacity = 1000 a1.channels.c1.transactionCapacity = 100 # Bind the source and sink to the channel a1.sources.r1.channels = c1 a1.sinks.k1.channel = c1 # ########################################################### node02服务器中,安装Flume(步骤略) 配置文件 # ########################################################### # Name the components on this agent a1.sources = r1 a1.sinks = k1 a1.channels = c1 # Describe/configure the source a1.sources.r1.type = avro a1.sources.r1.bind = node2 a1.sources.r1.port = 60000 # Describe the sink a1.sinks.k1.type = logger # Use a channel which buffers events in memory a1.channels.c1.type = memory a1.channels.c1.capacity = 1000 a1.channels.c1.transactionCapacity = 100 # Bind the source and sink to the channel a1.sources.r1.channels = c1 a1.sinks.k1.channel = c1 # ########################################################### 先启动node02的Flume flume-ng agent -n a1 -c conf -f avro.conf -Dflume.root.logger=INFO,console 再启动node01的Flume flume-ng agent -n a1 -c conf -f simple.conf2 -Dflume.root.logger=INFO,console 打开telnet 测试 node02控制台输出结果 案例3、Exec Source http://flume.apache.org/FlumeUserGuide.html#exec-source 配置文件 # ########################################################### a1.sources = r1 a1.sinks = k1 a1.channels = c1 # Describe/configure the source a1.sources.r1.type = exec a1.sources.r1.command = tail -F /home/flume.exec.log # Describe the sink a1.sinks.k1.type = logger # Use a channel which buffers events in memory a1.channels.c1.type = memory a1.channels.c1.capacity = 1000 a1.channels.c1.transactionCapacity = 100 # Bind the source and sink to the channel a1.sources.r1.channels = c1 a1.sinks.k1.channel = c1 # ########################################################### 启动Flume flume-ng agent -n a1 -c conf -f exec.conf -Dflume.root.logger=INFO,console 创建空文件演示 touch flume.exec.log 循环添加数据 for i in {1..50}; do echo "$i hi flume" >> flume.exec.log ; sleep 0.1; done 案例4、Spooling Directory Source http://flume.apache.org/FlumeUserGuide.html#spooling-directory-source 配置文件 # ########################################################### a1.sources = r1 a1.sinks = k1 a1.channels = c1 # Describe/configure the source a1.sources.r1.type = spooldir a1.sources.r1.spoolDir = /home/logs a1.sources.r1.fileHeader = true # Describe the sink a1.sinks.k1.type = logger # Use a channel which buffers events in memory a1.channels.c1.type = memory a1.channels.c1.capacity = 1000 a1.channels.c1.transactionCapacity = 100 # Bind the source and sink to the channel a1.sources.r1.channels = c1 a1.sinks.k1.channel = c1 # ########################################################### 启动Flume flume-ng agent -n a1 -c conf -f spool.conf -Dflume.root.logger=INFO,console 拷贝文件演示 mkdir logs cp flume.exec.log logs/ 案例5、hdfs sink http://flume.apache.org/FlumeUserGuide.html#hdfs-sink 配置文件 # ########################################################### a1.sources = r1 a1.sinks = k1 a1.channels = c1 # Describe/configure the source a1.sources.r1.type = spooldir a1.sources.r1.spoolDir = /home/logs a1.sources.r1.fileHeader = true # Describe the sink ***只修改上一个spool sink的配置代码块 a1.sinks.k1.type = logger a1.sinks.k1.type=hdfs a1.sinks.k1.hdfs.path=hdfs://bjsxt/flume/%Y-%m-%d/%H%M # #每隔60s或者文件大小超过10M的时候产生新文件 # hdfs有多少条消息时新建文件,0不基于消息个数 a1.sinks.k1.hdfs.rollCount=0 # hdfs创建多长时间新建文件,0不基于时间,时间单位 s a1.sinks.k1.hdfs.rollInterval=60 # hdfs多大时新建文件,0不基于文件大小 a1.sinks.k1.hdfs.rollSize=10240 # 当目前被打开的临时文件在该参数指定的时间(秒)内,没有任何数据写入,则将该临时文件关闭并重命名成目标文件 a1.sinks.k1.hdfs.idleTimeout=3 a1.sinks.k1.hdfs.fileType=DataStream a1.sinks.k1.hdfs.useLocalTimeStamp=true # # 每五分钟生成一个目录: # 是否启用时间上的”舍弃”,这里的”舍弃”,类似于”四舍五入”,后面再介绍。如果启用,则会影响除了%t的其他所有时间表达式 a1.sinks.k1.hdfs.round=true # 时间上进行“舍弃”的值; a1.sinks.k1.hdfs.roundValue=5 # 时间上进行”舍弃”的单位,包含:second,minute,hour a1.sinks.k1.hdfs.roundUnit=minute # Use a channel which buffers events in memory a1.channels.c1.type = memory a1.channels.c1.capacity = 1000 a1.channels.c1.transactionCapacity = 100 # Bind the source and sink to the channel a1.sources.r1.channels = c1 a1.sinks.k1.channel = c1 # ########################################################### 创建HDFS目录 hadoop fs -mkdir /flume 启动Flume flume-ng agent -n a1 -c conf -f hdfs.conf -Dflume.root.logger=INFO,console 查看hdfs文件 hadoop fs -ls /flume/... hadoop fs -get /flume/... 作业: 1、flume如何收集java请求数据 2、项目当中如何来做? 日志存放/log/目录下 以yyyyMMdd为子目录 分别存放每天的数据
项目模块设计* Map(k:按照所需的维度划分 v:唯一标志(便于后面去重))
Reduce(将相同的 k 汇聚到起来,对 value 的值进行去重累加)
ETL -MR 抽取 extract
转换 transform
加载 load
Hive 与 Hbase 整合 1 2 3 4 5 6 7 8 9 10 11 12 13 14 15 16 17 18 19 20 21 22 hive和hbase同步 https://cwiki.apache.org/confluence/display/Hive/HBaseIntegration 1、在hive的配置文件增加属性: <property> <name>hbase.zookeeper.quorum</name> <value>node2,node3,node4</value> </property> 2、在hive中创建临时表 CREATE EXTERNAL TABLE tmp_order (key string , id string , user_id string ) STORED BY 'org.apache.hadoop.hive.hbase.HBaseStorageHandler' WITH SERDEPROPERTIES ("hbase.columns.mapping" = ":key,order:order_id,order:user_id" ) TBLPROPERTIES ("hbase.table.name" = "t_order" );CREATE TABLE hbasetbl(key int , value string ) STORED BY 'org.apache.hadoop.hive.hbase.HBaseStorageHandler' WITH SERDEPROPERTIES ("hbase.columns.mapping" = ":key,cf1:val" )TBLPROPERTIES ("hbase.table.name" = "xyz" , "hbase.mapred.output.outputtable" = "xyz" );
Apache Sqoop
Sqoop 中导入和导出是相对于 HDFS的。
Sqoop 简介 Sqoop:将关系数据库(oracle、mysql、postgresql等)数据与 hadoop 数据进行转换的工具
官网:http://sqoop.apache.org/
版本:(两个版本完全不兼容,sqoop1使用最多)
sqoop1:1.4.x
sqoop2:1.99.x
同类产品
DataX:阿里顶级数据交换工具
Sqoop 架构
sqoop 架构非常简单,是 hadoop 生态系统的架构最简单的框架。
sqoop1 由 client 端直接接入 hadoop ,任务通过解析生成对应的 maprecue 执行
Sqoop 导入
将数据从 DataBase table 经由 MR 程序导入到 HDFS 中
Sqoop 导出
将数据从 HDFS 经由 MR 作业导出到DataBase table 中
Sqoop 安装 1 2 3 4 5 6 7 8 9 10 11 12 13 14 15 16 17 18 安装步骤: 1、解压 2、配置环境变量 export SQOOP_HOME=/XX/sqoop.xx source /etc/profile 3、添加数据库驱动包 cp mysql-connector-java-5.1.10.jar /sqoop-install-path/lib 4、重命名配置文件 mv sqoop-env-template.sh sqoop-env.sh 5、修改配置configure-sqoop 去掉未安装服务相关内容;例如(HBase、HCatalog、Accumulo): # if [ ! -d "${HBASE_HOME}" ]; then# echo "Error: $HBASE_HOME does not exist!"# echo 'Please set $HBASE_HOME to the root of your HBase installation.'# exit 16、测试 sqoop version sqoop list-databases -connect jdbc:mysql://node3:3306/ -username root -password 123
Sqoop 工具*
选项
含义说明
--connect<jdbc-uri>指定JDBC 连接字符串
--connection-manager<class-name>指定要使用的连接管理器类
--driver<class-name>指定要使用的 JDBC 驱动类
--hadoop-mapred-home<dir>指定 $HADOOP_MAPRED_HOME路径
--help万能帮助
--password-file设置用于存放认证的密码的信息文件的路径
-P从控制台读取输入的密码
--password<password>设置认证密码
--username<username>设置认证用户名
--verbose打印详细的运行信息
--connection-param-file<filename>可选,指定存储数据库连接参数的属性文件
导出工具
将 MySQL 中数据导入到 HDFS 中
1 2 3 4 5 6 7 8 9 10 11 12 13 14 15 16 17 18 19 20 21 22 23 24 25 26 27 28 29 30 31 32 33 34 35 36 37 38 39 40 41 import jdbc:mysql://node01:3306/result_db root 123 browser_name,browser_version dimension_browser /sqoop/data -m 1 sqoop import jdbc:mysql://node01:3306/result_db root 123 /sqoop/data -m 1 -e select * from dimension_browser where $CONDITIONS
将 MySQL 数据导入到 Hive 中
1 2 3 4 5 6 7 8 9 10 11 12 13 14 15 16 17 18 19 20 21 import jdbc:mysql://node01/result_db root 123 'select * from dimension_browser where $CONDITIONS' --delete-target-dir --target-dir /sqoop/tmp -m 1 --hive-home /user/hive/warehouse --hive-import --create-hive-table --hive-table t_browser
将 Hive 中导出到 MySQL 表中
1
2
3
4
5
6
7
8
9
10
11
12
13
14
15
export --connect jdbc:mysql://node01/test --username root --password 123 -m 1 --columns id,browser_name,browser_version --export-dir /sqoop/data --table h_browser
注意:MySQL中 test.h_browser 需要提前创建优化 调优的目的 1 2 充分的利用机器的性能,更快的完成 mr 程序的计算任务。 甚至是在有限的机器条件下,能够支持运行足够多的mr程序。
调优的总体概述 1 2 3 从mr程序的内部运行机制,我们可以了解到一个mr程序由mapper和reducer两个阶段组成,其中mapper阶段包括数据的读取、map处理以及写出操作(排序和合并/sort&merge),而reducer阶段包含mapper输出数据的获取、数据合并(sort&merge)、reduce处理以及写出操作。那么在这七个子阶段中,能够进行较大力度的进行调优的就是map输出、reducer数据合并以及reducer个数这三个方面的调优操作。 也就是说虽然性能调优包括cpu、内存、磁盘io以及网络这四个大方面,但是从mr程序的执行流程中,我们可以知道主要有调优的是内存、磁盘io以及网络。 在mr程序中调优,主要考虑的就是减少网络传输和减少磁盘IO操作,故本次课程的mr调优主要包括服务器调优、代码调优、mapper调优、reducer调优以及runner调优这五个方面。
服务器调优 1 服务器调优主要包括服务器参数调优和jvm调优。在本次项目中,由于我们使用hbase作为我们分析数据的原始数据存储表,所以对于hbase我们也需要进行一些调优操作。除了参数调优之外,和其他一般的java程序一样,还需要进行一些jvm调优。
推荐书籍: 《深入理解 Java 虚拟机 -周志明》
hdfs 调优 1. dfs.datanode.failed.volumes.tolerated: 允许发生磁盘错误的磁盘数量,默认为0,表示不允许datanode发生磁盘异常。当挂载多个磁盘的时候,可以修改该值。
2. dfs.replication: 复制因子,默认3
3. dfs.namenode.handler.count: namenode节点并发线程量,默认10
4. dfs.datanode.handler.count:datanode之间的并发线程量,默认10。
5. dfs.datanode.max.transfer.threads:datanode提供的数据流操作的并发线程量,默认4096。
一般将其设置为linux系统的文件句柄数的85%~90%之间,查看文件句柄数语句ulimit -a,修改vim /etc/security/limits.conf, 不能设置太大
文件末尾,添加
* soft nofile 65535
* hard nofile 65535
注意:句柄数不能够太大,可以设置为1000000以下的所有数值,一般不设置为-1。
异常处理:当设置句柄数较大的时候,重新登录可能出现unable load session的提示信息,这个时候采用单用户模式进行修改操作即可。
单用户模式:
启动的时候按'a'键,进入选择界面,然后按'e'键进入kernel修改界面,然后选择第二行'kernel...',按'e'键进行修改,在最后添加空格+single即可,按回车键回到修改界面,最后按'b'键进行单用户模式启动,当启动成功后,还原文件后保存,最后退出(exit)重启系统即可。
6. io.file.buffer.size: 读取/写出数据的buffer大小,默认4096,一般不用设置,推荐设置为4096的整数倍(物理页面的整数倍大小)。hbase调优 1. 设置regionserver的内存大小,默认为1g,推荐设置为4g。
修改conf/hbase-env.sh中的HBASE_HEAPSIZE=4g
2. hbase.regionserver.handler.count: 修改客户端并发线程数,默认为10。设置规则为,当put和scans操作比较的多的时候,将其设置为比较小的值;当get和delete操作比较多的时候,将其设置为比较大的值。原因是防止频繁GC操作导致内存异常。
3. 自定义hbase的分割和紧缩操作,默认情况下hbase的分割机制是当region大小达到hbase.hregion.max.filesize(10g)的时候进行自动分割,推荐每个regionserver的region个数在20~500个为最佳。hbase的紧缩机制是hbase的一个非常重要的管理机制,hbase的紧缩操作是非常消耗内存和cpu的,所以一般机器压力比较大的话,推荐将其关闭,改为手动控制。
4. hbase.balancer.period: 设置hbase的负载均衡时间,默认为300000(5分钟),在负载比较高的集群上,将其值可以适当的改大。
5. hfile.block.cache.size:修改hflie文件块在内存的占比,默认0.4。在读应用比较多的系统中,可以适当的增大该值,在写应用比较多的系统中,可以适当的减少该值,不过不推荐修改为0。
6. hbase.regionserver.global.memstore.upperLimit:修改memstore的内存占用比率上限,默认0.4,当达到该值的时候,会进行flush操作将内容写的磁盘中。
7. hbase.regionserver.global.memstore.lowerLimit: 修改memstore的内存占用比率下限,默认0.38,进行flush操作后,memstore占用的内存比率必须不大于该值。
8. hbase.hregion.memstore.flush.size: 当memstore的值大于该值的时候,进行flush操作。默认134217728(128M)。
9. hbase.hregion.memstore.block.multiplier: 修改memstore阻塞块大小比率值,默认为4。也就是说在memstore的大小超过4*hbase.hregion.memstore.flush.size的时候就会触发写阻塞操作。最终可能会导致出现oom异常。mapreduce调优 1. mapreduce.task.io.sort.factor: mr程序进行合并排序的时候,打开的文件数量,默认为10个.
2. mapreduce.task.io.sort.mb: mr程序进行合并排序操作的时候或者mapper写数据的时候,内存大小,默认100M
3. mapreduce.map.sort.spill.percent: mr程序进行flush操作的阀值,默认0.80。
4. mapreduce.reduce.shuffle.parallelcopies:mr程序reducer copy数据的线程数,默认5。
5. mapreduce.reduce.shuffle.input.buffer.percent: reduce复制map数据的时候指定的内存堆大小百分比,默认为0.70,适当的增加该值可以减少map数据的磁盘溢出,能够提高系统性能。
6. mapreduce.reduce.shuffle.merge.percent:reduce进行shuffle的时候,用于启动合并输出和磁盘溢写的过程的阀值,默认为0.66。如果允许,适当增大其比例能够减少磁盘溢写次数,提高系统性能。同mapreduce.reduce.shuffle.input.buffer.percent一起使用。
7. mapreduce.task.timeout:mr程序的task执行情况汇报过期时间,默认600000(10分钟),设置为0表示不进行该值的判断。代码调优 代码调优,主要是mapper和reducer中,针对多次创建的对象,进行代码提出操作。这个和一般的java程序的代码调优一样。
1 2 3 4 5 6 7 mapper调优主要就是就一个目标:减少输出量。我们可以通过增加combine阶段以及对输出进行压缩设置进行mapper调优。 combine介绍: 实现自定义combine要求继承reducer类,特点: 以map的输出key/value键值对作为输入输出键值对,作用是减少网络输出,在map节点上就合并一部分数据。 比较适合,map的输出是数值型的,方便进行统计。 压缩设置: 在提交job的时候分别设置启动压缩和指定压缩方式。
由于hbase默认是一条一条数据拿取的,在mapper节点上执行的时候是每处理一条数据后就从hbase中获取下一条数据,通过设置cache值可以一次获取多条数据,减少网络数据传输。